Category

Trends

eyebrow service close up

Here’s How to Get Perfect Eyebrows: Brow Waxing + Tints

By | Trends

Your eyebrows are one of the first things people notice about you. They frame your face, make up your expressions and pull your whole look together. But getting them just right? That takes more than a pair of tweezers and a hand mirror. At Stephanie Moss Salon, we specialize in professional eyebrow waxing that creates clean, polished brows designed to complement your unique features and the shape of your face. 

If you’ve been relying on at-home plucking or DIY kits, here’s why a salon-quality brow wax makes all the difference. 

What Is a Brow Wax?

A brow wax is a quick and effective service where warm wax is carefully applied to remove unwanted hair and shape the brows. The process pulls hair directly from the root, giving you a sharper, longer-lasting result than tweezing or trimming at home. 

Our stylists take the time to map your brows and create a flattering shape that works with your natural bone structure. The result is symmetrical, well-defined brows that look effortless and don’t take forever to do. 

The Benefits of Eyebrow Waxing

Choosing a professional eyebrow waxing service comes with plenty of perks: 

  • Precise shaping: Every hair is removed with intention, giving you clean lines and symmetry. It’s easier to get those perfect lines when the hair is being removed all at once.
  • Longer-lasting results: Unlike shaving or trimming, waxing removes hair from the root for smoothness that lasts up to 3–4 weeks.
  • Time-saving: No more daily brow upkeep! Just great-looking eyebrows that stay in shape.
  • Gentle on the skin: With the right technique and products, waxing can be less irritating than constant tweezing.
  • Custom results: Our specialists tailor the shape to your features and personal style. 

And for those looking to upgrade their results even further, we also offer brow tinting: a perfect add-on to make your brows look fuller and more defined. (Which is different from microblading, a permanent makeup service that actually colors the skin beneath your brows.) 

Eyebrow Waxing vs. Other Hair Removal Methods

Wondering why waxing is the preferred method? Here’s how it stacks up: 

  • Waxing vs. Tweezing: Waxing removes multiple hairs at once with precision, saving time and avoiding over-plucking.
  • Waxing vs. Threading: Waxing is typically quicker and gentler on the skin — threading can lead to irritation from friction
  • Waxing vs. Shaving: Shaving cuts the hair at the surface, leading to stubbly regrowth. Waxing removes it from the root for smoother, longer-lasting results. 

With salon-grade wax and expert application, you’ll notice an immediate difference in the look and feel of your brows. 

What to Expect at Your Brow Wax Appointment

Your appointment is quick, easy and about what you want for your brows. Here’s what you can expect: 

  • Consultation: We’ll discuss your brow goals and map out your ideal shape.
  • Waxing & Shaping: Warm wax is carefully applied, removing hair precisely.
  • Soothe & Finish: We’ll treat your skin to minimize redness and leave your brows looking fresh.
  • Aftercare Tips: Simple steps like avoiding heavy makeup or retinol around the area for 24 hours will keep your brows looking (and feeling) their best. 

Most clients find eyebrow waxing takes less than 15 minutes. 

Common Questions About Brow Waxing

Does eyebrow waxing hurt? 

You may feel a quick pinch, but most clients describe it as very tolerable, and it’s over in seconds. 

How long does a brow wax last? 

Typically 3–4 weeks, depending on your hair growth cycle. 

Is waxing safe for sensitive skin? 

It depends — some people with sensitive skin much prefer waxing to shaving and experience less irritation. Just make sure to let us know before getting in the chair. 

Can I still wax if I use retinol? 

Retinol and other strong skincare ingredients can make the skin more sensitive. Let your stylist know about your routine, and we’ll help you plan the safest service. 

Get the Brows You’ve Always Wanted at Stephanie Moss Salon

Brows are all about balance and detail — that’s why they’re best left to the experts. At Stephanie Moss Salon, our trained specialists deliver perfectly shaped brows using professional techniques and skin-safe products. We take pride in creating a relaxing experience and results that give your face a polished, put-together look. 

Whether you want a natural arch, bold definition or brows that simply look “cleaned up,” our team will customize your brow wax to you. It’s time to give your brows the attention they deserve. Skip the tweezers — let our professionals shape your eyebrows with precision and care. 

Book your appointment today at Stephanie Moss Salon today and see how flawless brows can transform your look! 

Woman with brown hair showing small gray area

The Best Hair Color to Cover Gray + Your Other Questions Answered

By | Trends

Gray hair is a natural part of life, but how you choose to manage it is entirely personal.  

Some of us embrace the silver and some prefer seamless, salon-quality coverage. You’ve got options! At Stephanie Moss Salon, we specialize in coloring graying hair in a way that protects your strands and makes you feel stunning. 

Let’s talk about the causes of gray hair, how to care for it, the best hair color to cover gray and how to make the transition in both directions, no matter what your hair looks like now. It’s time to take the mystery (and stress) out of going gray! 

Why Does Hair Turn Gray?

Gray hair happens when your body slows down melanin production, which gives your hair its natural color. This process is often genetic but can also be influenced by stress, nutrition or certain health conditions. 

You might wonder why hair doesn’t turn blonde instead if it’s lightening anyway — this explanation gets a little science-y, but we’ll keep it short. There are two kinds of melanin: eumelanin (brown/black) and pheomelanin (red/yellow). Blonde or reddish hair has a higher proportion of pheomelanin than darker hair. As people with different hair colors age, their melanin type doesn’t change; their production is just reduced. 

That’s part of why our hair doesn’t “turn” gray overnight. As melanin production slows down, hair loses pigment over time, often starting around the temples or roots. For most of us, once the gray comes in, it tends to stay. 

Gray vs. White Hair

Gray hair still contains some pigment, which blends with non-pigmented strands to create a silver or salt-and-pepper appearance (which many people love). In contrast, white hair has lost all its pigment and appears pure white. 

As our hair slows its melanin production to a trickle, gray hair often eventually turns white. Both white and gray hair can be covered or blended beautifully with professional color services, depending on your goals. Book a consultation with our stylists so we can get the whole picture! 

Common Gray Hair Concerns (And How to Solve Them)

Why Is Gray Hair Coarse? 

Many people notice that gray hair feels wiry, dry or more difficult to manage when compared to their previous hair type. That’s because your scalp produces less sebum (natural oil) as you age, making gray strands feel rough or frizzy. Professional moisturizing treatments, color glosses and high-quality home care products like conditioning masks can restore some of that softness and shine. 

Why Does Gray Hair Turn Yellow? 

Yellowing gray hair is more common than you might think. It can be caused by: 

  • Product buildup
  • Hard water
  • Heat styling without using a protectant
  • UV rays and sun exposure
  • Smoking and other pollutants 

If you love your gray, silver or white hair, we recommend using a purple-toned shampoo to neutralize brassiness and keep those tones bright and cool. You might want to try a clarifying shampoo to counteract possible hard water or product buildup — consider professional treatments like toners to maintain the look you want. 

The Best Hair Color to Cover Gray

When it comes to covering gray, not all hair color is created equal. The best hair color to cover gray is one that: 

  • Provides even, lasting coverage
  • Matches your skin tone and natural shade
  • Respects your hair’s texture and health 

Consider going a couple shades lighter than your natural color to help with blending and make regrowth less noticeable. In general, lighter colors will require less maintenance since there will be less contrast. You can even go with highlights if you’re not ready for a full color change.  

If you have particularly warm hair, naturally leaning golden or red, talk with your stylist about how to incorporate ashier tones and keep everything cohesive. 

Stephanie Moss Salon offers custom-blended formulas using the best hair dye to color gray. Our stylists use techniques like full coverage, demi-permanent color, glosses, root shadowing and highlights/lowlights to create a result that feels natural instead of flat or harsh. 

Hair is personal, and it’s important. We can help recommend the best color to cover gray hair for your specific hair type, lifestyle and maintenance preferences, on top of your natural coloring and sense of style. 

How to Grow Out Gray Hair That Is Colored

Ready to go natural? You’re not alone, and you can be excited! Lots of clients choose to embrace their gray, and we love helping them make that transition. 

Some of our strategies to help with this journey: 

  • Add color on grey hair using lowlights or toners to reduce contrast
  • Use root-blending techniques to soften regrowth
  • Try a gray gloss or silver-enhancing toner
  • Use coloring shampoo for gray hair to keep unwanted tones at bay 

This process doesn’t have to be painful, and it can be as sudden or gradual as you’re comfortable with. We’ll help you look polished and intentional every step of the way. 

Coloring Graying Hair: Salon vs. DIY

Why choose salon color over at-home dye? Professional color: 

  • Offers better gray coverage, especially for coarse or resistant strands
  • Preserves hair integrity and avoids over-processing
  • Allows for personalized, multi-dimensional results
  • Includes proper toning, application and aftercare 

Bottom line? The best hair color for gray hair is the one tailored just for you — and applied by a stylist who understands how to make the most of your current hair instead of fighting it. 

Final Tips for Maintaining Beautiful Gray Hair

Whether you’re coloring or embracing the gray, good care goes a long way. 

  • Use gentle shampoo and conditioner (maybe even purple-toned)
  • Limit heat styling or use heat protectant
  • Deep condition regularly to keep strands soft
  • Protect your hair from sun and chlorine
  • Schedule salon touch-ups or glosses as needed 

Let’s Talk About Your Gray Hair Goals

There’s no one-size-fits-all when it comes to graying hair. We’re here to support you from consultation to full-color to blending out regrowth. 

In the end, our aim is the same as it always is: to help you feel beautiful. 

Book your appointment today at Stephanie Moss Salon today and let’s create a plan that works beautifully for you! 

blonde hair extensions

The Ultimate Guide to the Best Hair Extensions

By | Trends

If you’ve ever dreamed of longer, fuller or more voluminous hair, we’ve got exciting news: Stephanie Moss Salon now offers hair extensions in Omaha!  

From subtle length to dramatic transformations, our team uses high-quality, professional-only Amplify Hair Extensions for natural-looking, long-lasting results. Not sure if you’re ready to make the commitment? Still have questions? We’ll walk you through the different types of hair extensions, what you can expect for cost, how long they’ll last, how to maintain them and other questions we get a lot. 

What Are the Different Types of Hair Extensions?

Sew In Hair Extensions 

Sew-in hair extensions can be executed several ways, but ours involve attaching the wefts (strips of hair) to your natural hair using small beads and a unique sewing loop. We secure a row of tiny, discreet beads at the base of your natural hair, under your top layer so it blends seamlessly. This application method gives you secure, long-lasting wear with minimal maintenance between appointments. 

Our clients love sew-ins because they look natural, are less damaging than glue or heat methods and let you do your hair in various styles without worrying about slippage. 

Tape In Hair Extensions 

Tape-ins are a popular choice due to their fast installation time. These extensions are applied using an adhesive to “tape” sections of the extensions to your hair. While we do offer tape in hair extensions, they require more frequent upkeep, are harder to conceal and aren’t as long-lasting as sew-ins are. 

What Are the Best Hair Extensions for Me?

The best hair extensions depend on your hair goals, texture and maintenance preferences.  

At Stephanie Moss Salon, we offer a range of shades and lengths to ensure a seamless blend. We use Remy hair — that’s human hair, specifically chosen and processed to maintain the cuticles in a single direction. That reduces tangling, gives you a smoother texture and honestly? Looks expensive. 

Whether you’re a brunette wanting extra volume, a redhead who wants to add eight inches to your length or searching for the perfect match in blonde hair extensions, we’ve got you covered. 

During your consultation, we’ll help you choose the right length and color to match your natural look (or talk about color). We also make a point to consult about hair extensions for thin hair — we want to make sure the added weight doesn’t put unnecessary strain on your hair or scalp. 

How Much Do Hair Extensions Cost?

One of the most common questions we get is: “How much are hair extensions?” or “How much do hair extensions cost?” 

Pricing varies based on: 

  • The type of extension (sew-in vs. tape-in)
  • The length and volume of hair you’re adding
  • Installation time
  • Ongoing maintenance needs 

Generally, sew-in extensions are a bigger upfront investment but require fewer appointments for maintenance. They last longer and are easier to maintain. During your consultation, we’ll give you a transparent quote so you can make the best decision for your budget and goals. 

How Long Do Hair Extensions Last?

With the proper care, sew in hair extensions can last 6–8 weeks before needing to be adjusted or reapplied. The hair itself can often be reused for multiple installations, especially when you’re using premium brands. 

Tape in hair extensions typically need to be reapplied every 4–6 weeks. When it’s time to redo them, you’ll have to take the extensions out, carefully and thoroughly wash off the adhesive then glue them back in place. If the adhesive isn’t ideally taken care of, it may need to be reapplied more frequently. 

Proper maintenance can significantly impact how long your hair extensions last. That brings us to one of the most important topics: care. 

How to Wash Hair Extensions and Maintain Them

Wondering how to wash hair extensions? It’s simpler than you think but requires a little TLC: 

  • Avoid washing too frequently. 2–3 times per week is ideal.
  • Gently brush with a loop or wide-tooth comb to avoid tugging. 

We’ll provide you with specific aftercare instructions to keep both your extensions and natural hair in top condition. 

Do Hair Extensions Ruin Your Hair?

It’s a common concern, but when applied professionally and maintained properly, hair extensions do not ruin your hair. In fact, methods like sew-ins might help protect your natural hair from daily heat styling and environmental stress. 

Our stylists are trained to assess your hair health before recommending any extension method. We prioritize both style and scalp health. The whole point of getting extensions is to feel better about the way you look — we want to make your experience as positive as possible, from start to finish. 

Hair Extensions FAQ

Thinking about getting hair extensions but still have a few questions? We get it. Getting extensions is a big decision, and we want you to feel 100% informed before you book. Here are some of the most common questions we hear from first-time clients. 

Will hair extensions match my hair color? Can you dye hair extensions if you want another look?

Yes! We offer a wide range of shades, including blonde hair extensions, brunettes, reds and custom blends. During your consultation, we’ll color-match your natural hair. 

We recommend choosing the right color from the start, but in some cases, professional toning or custom coloring can be done, especially with 100% human hair extensions like ours. Definitely consult with your stylist before trying to apply color at home. 

How often do I need professional maintenance?

  • Sew-ins typically require maintenance every 6–8 weeks.
  • Tape-ins need to be re-taped every 4–6 weeks. 

 We’ll work with you to create a maintenance schedule that works with your routine and your unique head of hair! 

Can I work out or swim with hair extensions? 

Yes, but it’s best to wear your hair in a braid or bun to prevent tangling. (Not too tight, though!) Always rinse your hair with fresh water after swimming to remove chlorine or salt and avoid soaking extensions for prolonged periods. 

Let your stylist know if you’re someone who often wears their hair up — it might impact the best placement for installation. 

How should I sleep with hair extensions? 

We recommend sleeping with your hair in a loose braid or ponytail to prevent matting and breakage. Use a silk or satin pillowcase to reduce friction. 

What products should I avoid? 

Stay away from:

  • Products with sulfates or alcohol.
  • Heavy oils or silicone-based serums near the roots.
  • Dry shampoos with high alcohol content (although dry shampoo is a game-changer overall). 

 We’ll personally recommend a few salon-approved products during your visit. 

Can I use heat tools on my extensions? 

Yes! Some synthetic hair extensions aren’t heat-safe, but with extensions from Stephanie Moss Salon, you can curl, straighten or blow-dry as usual. Just remember to use a heat protectant spray and keep the temperature moderate. 

How do I brush or detangle hair extensions? 

Use a loop brush or wide-tooth comb, starting from the ends and gently working upward. Hold the roots as you brush to reduce tension on your scalp and the extension attachment points. 

Are hair extensions safe for thin or fine hair? 

Absolutely. In fact, many clients with fine hair love extensions for the added volume and fullness. We’ll assess your hair during the consultation to choose the safest, most flattering method.  

Will people be able to see the extensions? 

Not at all. When properly matched, placed and styled, extensions blend seamlessly with your natural hair. The goal is for people to notice your gorgeous hair — not your extensions! 

How long does the appointment take? 

Installation time varies and depends on several factors, but as a general rule: 

  • Sew-ins: 2–4 hours
  • Tape-ins: 1–2 hours 

 We’ll give you a time estimate when you book based on your hair and desired outcome. 

What’s the total cost of hair extensions, including maintenance? 

The initial investment includes the cost of the hair and installation. Maintenance appointments are lower-cost and vary depending on type and timing. We’ll provide a full breakdown during your consultation so there are no surprises — but it will depend on how much hair you’re adding! 

Get Hair Extensions Today

If you’re ready to add to your look (literally), we’re here to help you achieve the length, volume and confidence you deserve. 

Call for more information about our hair extension services or go ahead and book a consultation online — let’s create the hair transformation of your dreams. 

Chocolate Brown Balayage hairstyle

Minimal Maintenance, Maximum Style: The 9 Best Balayage Colors

By | Trends

If you’re looking for a hair color that turns heads without turning into a full-time job, the balayage might just be your new best friend. This hand-painted highlighting technique is beloved for its soft, blended results and super easy upkeep — perfect for anyone who wants to look freshly put-together without constant touch-ups. 

Should You Get a Balayage?

Balayage is all about creating a natural, blended effect that doesn’t demand a salon visit every 4–6 weeks. Here’s why it’s perfect for anyone wanting low-maintenance blonde hair or softer color transitions: 

  • No harsh grow-out lines — the color fades gradually and gracefully.
  • Fewer salon visits — save time and money while still looking polished.
  • Customizable to your lifestyle — from soft, natural face-framing to full blonding. 

At Stephanie Moss Salon, we specialize in balayage color that grows out beautifully, especially for clients who love a little (or a lot of) blonde without the hassle. Whether you’re transitioning away from fully blonde locks or dipping your toe into the look, we’re here to support you!  

Here are our best balayage colors to deliver maximum style with minimal maintenance. 

1. Caramel Balayage

Caramel Balayage hairstyle

Warm, golden caramel highlights are the perfect way to lighten up dark hair without over-committing to blonde. Caramel balayage adds dimension and movement to brunette bases and looks incredibly natural as it grows out—ideal for busy lifestyles. You can take it cooler or warmer, depending on your preference (and your undertone). Consider asking for a honey caramel balayage to get a look that leans on golden tones. 

2. Ash Blonde Balayage 

Ash Blonde Balayage hairstyle

Smoky ash tones are always trending with the cool girls for a reason. An ash blonde balayage gives you that sophisticated edge without constant root touch-ups, if you’re starting with cooler hair. It’s especially flattering for those with cool or neutral undertones and blends beautifully with natural dark blonde or light brown hair. 

3. Toffee Brunette

Toffee Brunette hairstyle

Think of this as the brunette balayage version of a cozy sweater. Rich, warm toffee tones melt seamlessly into darker hair for a subtle lift that’s low on maintenance but high on elegance. This kind of balayage on dark brown hair is great for brunettes who want something new without bleaching their whole head.

4. Champagne Beige Blonde 

Champagne Beige Blonde hairstyle

Looking for a soft, creamy blonde balayage that works year-round? Champagne beige is light, flattering and gives a sun-kissed finish that’s easy to maintain. It pairs especially well with natural blondes or light brunettes and fades like a dream. 

5. Rose Gold Balayage

Rose Gold Balayage hairstyle

Add a playful twist with rose gold blended with blushy, peachy or pinkish tones that give blonde hair a fresh, youthful vibe. This fun color will fade gradually and beautifully, so even as it softens over time, your hair still looks polished. 

6. Cinnamon Spice 

Cinnamon Spice hairstyle

A little red, a little copper, a lot of glow. Cinnamon balayage adds warmth and brightness to darker hair with minimal maintenance. It’s a great way to try red tones without fully committing to a true red or copper balayage and grows out in a soft, lived-in way that can really bring out your eyes and smile.

7. Icy Platinum Ends 

Icy Platinum Ends hairstyle

Craving something bold? Platinum balayage lets you enjoy high-contrast color for a little longer than a fully platinum look. By concentrating icy tones on the ends and blending from a darker root, you get the drama of platinum with the wearability of balayage. (This kind of highlight is especially fun with an updo, for the record.)

8. Chocolate Brown Balayage

Chocolate Brown Balayage hairstyle

A beautiful balayage doesn’t have to be dramatic. Especially for brunettes with naturally dark hair, getting any new color in the picture can be a huge ordeal or lead to an extremely contrasted look — which isn’t always what we’re looking for. The chocolate brown balayage is the twin sister to a soft blonde upping her highlights: a little bit can go a long way.

9. Bronde Balayage Blend

Bronde Balayage Blend hairstyle

Not quite blonde, not quite brunette, bronde balayage hits the sweet spot. It’s universally flattering, super versatile and grows out with almost zero lines. This is the ultimate choice for a subtle yet impactful change — and the look that most people imagine when they wonder if they should get a balayage or not.

Keep That Color Fresh: Balayage Maintenance Tips

While balayage is known for its easy upkeep, here are a few pro tips to help your color look its best between visits: 

  • Use a sulfate-free, color-safe shampoo to protect tone and prevent fading.
  • Add a toning treatment or gloss every 6–8 weeks to maintain your color’s vibrancy.
  • Apply a deep conditioning mask weekly to keep your new ‘do hydrated.
  • Always use heat protectant before styling to avoid color damage. 

Other Questions About Balayage

We hear you. We’ve got answers. 

What’s the difference between balayage vs highlights? 

This is the number one question we get about the topic. Highlights as a salon service are usually applied with foils and have a more defined, uniform color. There’s more variation with a hand-painted balayage, which makes the end result more natural and blended. ‘Balayage’ is actually a French word, meaning to ‘sweep’ or paint — it describes the way that the stylist applies lightener. 

How long does a balayage take to do? 

Depending on the thickness and length of your hair, the amount of lightening you want, the expertise of your stylist and the style you want, a full balayage could take anywhere from 1.5–3 hours. A partial balayage won’t take as long. Check with your stylist to see what their best guess is for your unique situation. 

What is reverse balayage? 

In the same way that lowlights are the “reverse” of highlights — adding in darker hair to create dimension — reverse balayage does the same thing, hand-painting darker areas for more contrast and dimension with the same method as balayage highlighting. 

What is a full vs partial balayage? 

A full balayage includes lightened sections all over your hair, versus a partial balayage which only focuses on a few areas. A partial balayage usually involves pieces in the front to frame the face without taking as long or costing as much. 

What about ombre vs balayage? Or babylights? 

Ombre is a more dramatic gradient shift, where your hair is visually split into two sections (a top and a bottom). Babylights are teeny-tiny highlights, applied either with foils or through balayage, meant to mimic the way a child’s hair might naturally blond in the sun. Something we love about the beauty industry is the way that it constantly changes, evolves and improves — which also means there are constantly new techniques and trends to learn and master.  

You shouldn’t have to choose between stylish and simple.  

We consider ourselves a balayage hair salon (Stephanie Moss herself is a L’Oreal Professional Balayage artist!) and we take the time to custom-blend your perfect color — no matter what that is. 

Book your consultation today and let’s find your perfect blend! 

frizzy hair being brushed

Why Is My Hair So Frizzy? Salon-Approved Solutions

By | Trends

If you’ve ever spent time styling your hair only to have it turn into an unruly mess minutes later, you’re not alone. Frizz is a common struggle for many hair types, and while it may seem like a battle you can’t win, the good news is that frizz is manageable with the right care. 

At Stephanie Moss Salon, we know how frustrating frizzy hair is, but we also know that the secret to smooth, healthy locks starts with understanding what’s causing the frizz in the first place. Let’s break down the top reasons your hair is frizzy and, more importantly, how we can help you get it under control. 

What Causes Frizzy Hair? 

Frizz happens when the outer layer of your hair (the cuticle) lifts, allowing moisture from the air to penetrate the strands. This causes hair to get bigger and take on that unwanted frizzy texture. You might recognize it as dry or damaged hair, but that doesn’t mean it has to stay that way! 

But why does this happen? Here are the most common culprits: 

  1. Lack of Moisture – Dry hair craves hydration, and when it doesn’t get enough, it sucks moisture from the air, resulting in frizz.
  2. Humidity & Weather – High humidity levels make frizz worse by forcing water into your hair (the same problem as dry hair, but for a different reason).
  3. Heat Damage – Excessive use of hot tools can strip hair of its natural moisture, leading to dryness and frizz.
  4. Over-washing – Washing too often can remove essential oils that keep hair smooth.
  5. Wrong Hair Products – Harsh shampoos, alcohol-based styling products and sulfates can make hair more prone to frizz. 
  6. Rough Towel Drying – Rubbing hair with a regular towel causes friction, leading to breakage and frizz. 
  7. Brushing Dry Hair – Brushing curls or waves when dry can separate strands and create frizz. 
  8. Chemical Treatments – Overprocessed hair (after color, relaxers, perms) is often more porous, making it more susceptible to frizz. 
  9. Split Ends & Damage – Damaged ends don’t hold moisture well, making hair appear frizzier. 
  10. Hair Type & Genetics – Some hair types naturally hold more frizz than others.

How to Fix Frizzy Hair Solutions 

If you’re tired of battling frizz, it’s time for a hair care routine that works! Here are the top professional tips to keep your hair smooth and healthy: 

  • Hydrate Your Hair – A lot of the issues with frizz boil down to your hair being too dry. Use a moisturizing shampoo and conditioner to lock in hydration. Deep conditioning treatments are a must!
  • Choose the Right Products – Opt for sulfate-free shampoos, leave-in conditioners and anti-frizz serums to nourish and protect your hair.
  • Wash Less, Condition More – Over-washing strips hair of its natural oils. Try washing every 2–3 days and use dry shampoo in between.
  • Towel Dry the Right Way – Swap out your rough cotton towel for a microfiber towel or a soft t-shirt to reduce friction and breakage. And don’t go to sleep on wet hair!
  • Use Heat Tools Wisely – Always apply a heat protectant before styling and try to air-dry when possible.
  • Brush with Care – Use a wide-tooth comb on wet hair and avoid brushing curls or waves when dry.
  • Regular Trims Matter – Split ends make hair look even frizzier. Keeping up with regular trims helps maintain healthy, smooth strands.
  • Salon Treatments for Frizz Control – Professional deep conditioning treatments, keratin treatments and gloss treatments can work wonders. 

Say Goodbye to Frizz – Book Your Salon Appointment Today! 

Frizz may seem stubborn, but with the right care, it doesn’t have to be! At Stephanie Moss Salon, we specialize in bringing out the best in your hair, whether it’s taming frizz or adding volume. We’ve got you covered with nourishing deep conditioning treatments, fresh haircuts to remove split ends and expert product recommendations tailored to your hair type. 

Book a consultation with one of our stylists today and take the first step toward sleek, frizz-free hair! 

The Complete Microblading Healing Process: What to Expect

By | Trends

Microblading — semi-permanent makeup that essentially tattoos on your desired brows — has become one of the most popular ways to achieve natural, fuller eyebrows without the daily hassle of filling them in. The whole tattooing part throws some people for a loop, though: what does that mean they’ll look like immediately afterward? Will they heal quickly? What does microblading maintenance look like? Does it hurt? 

No matter if you’re brand new to the world of semi-permanent makeup or just preparing for your microblading appointment, you should definitely understand the microblading healing process. After all, getting those perfect brows means you’ll want them to heal correctly. 

In this blog, we’ll take you through the microblading healing stages, share tips for effective microblading aftercare and give you advice on how to ensure that your brows heal beautifully and evenly. Ready? 

What Is Microblading?

Microblading is a semi-permanent tattooing technique that creates the appearance of fuller, more defined brows by using hair-like strokes. Using a fine blade, pigment is deposited into the upper layers of the skin, which allows for a more natural, defined look compared to traditional eyebrow tattoos — no Sharpie brows here. 

Many people choose microblading to achieve brows that are fuller, more symmetrical and perfectly shaped to suit their face. (Anyone who groomed their eyebrows with a little too much zeal might be interested in microblading overplucked eyebrows, as an example.) 

To get the best results, it’s important to know what to expect during and immediately after the microblading healing process and how to care for your brows. 

The Microblading Healing Timeline

The microblading healing process typically takes about 6 weeks, with different stages of healing that require varying levels of care. Here’s what most people can expect during each stage: 

1–2 Days: Initial Healing 

Right after your microblading procedure, you’ll likely notice some redness and tenderness around the brows. This is normal since the skin is recovering. Swelling may occur, but it should subside within a few hours. 

Aftercare Tips:

  • Avoid touching or scratching the area.
  • Don’t get your eyebrows wet for the first 24 hours.
  • Keep your brows clean with a gentle cleanser but avoid using makeup on them for the first 10–14 days.
  • If you feel they’re too dark, don’t worry! Around 30% of the pigment is lost in the first couple of weeks, so they may start out darker than expected — this way, they’ll still look gorgeous once they fade. 

3–7 Days: Early Healing 

During the first week, your new brows may feel dry and begin to scab over. This is a natural part of the healing process. The pigment will initially appear darker than it will once your brows are fully healed, and you might experience some itching as the scabs start to form. 

Aftercare Tips: 

  • Apply the aftercare ointment provided by your technician to keep the area moisturized.
  • Avoid direct contact with water and excessive sweating.
  • Don’t pick at the scabs — let them fall off naturally to avoid disturbing the healing process or losing uneven pigment. 

2–4 Weeks: Mid Healing 

By week 2, the scabs should start to fall off, revealing a lighter, patchy look. This can be alarming if you’re not expecting it, but rest assured, this is a normal part of the microblading healing stages. The pigment might appear uneven during this time, but that’s because the skin is still healing, and the color is settling into the skin. By the end of the timeline, the light patches will darken again to match.  

Aftercare Tips: 

  • Continue applying a thin layer of aftercare ointment.
  • Avoid sun exposure and tanning beds to prevent fading.
  • Don’t apply makeup or lotion directly on your brows, but you can go back to your regular skincare routine. 

4–6 Weeks: Late Healing 

By the end of the healing period (around 6 weeks), your brows will begin to settle into their final shape and color. The pigment will appear softer, and the hair strokes look more natural. However, this doesn’t mean that your healing process is entirely over — you may want a touch-up appointment after this stage to perfect the shape and fill in any sparse areas, especially if you accidentally bumped them in the earlier healing stages. 

Aftercare Tips: 

  • Use sunscreen (at least SPF 30, up to SPF 50!) when going outdoors to protect your brows from UV rays, which can cause fading.
  • It’s very common to come in for a final touch-up appointment at this point — don’t hesitate to let us know you’d like to come in! 

Common Issues During the Microblading Healing Process

While the microblading healing process is typically straightforward, there are a few common issues that come up, even if you’re doing everything completely perfectly.  

Itching and Dryness 

As your brows heal, you may experience itching or dryness. This is extremely common; it’s just like when a scab starts itching anywhere else on your body. But it’s incredibly important not to scratch or pick at the area, as this can cause scarring or affect the pigment. 

Solution: Apply a thin layer of aftercare ointment to soothe itching and keep the area hydrated. And try to be patient — this part doesn’t last forever! 

Infection 

If your brows become unusually red, swollen, hot or start to ooze, this could be a sign of infection. If you notice any signs of infection, contact your technician or a healthcare professional immediately. 

Solution: Keep your brows clean, avoid touching them with dirty hands and follow aftercare instructions carefully to reduce the risk of infection. 

Uneven Healing 

Sometimes, one eyebrow may heal faster or more evenly than the other. This can be frustrating, but the microblading healing process can vary for each individual brow.  

Solution: If you’re concerned, your technician may recommend a touch-up appointment to even them out. 

Microblading Aftercare Tips

Proper microblading aftercare is how to make sure your brows heal beautifully. Follow these tips for the best results:

  • Clean your brows gently after the first 24 hours. Use a mild, non-irritating cleanser and avoid using harsh chemicals or makeup removers.
  • Moisturize. Apply a thin layer of the aftercare ointment your technician provides to prevent dryness and flakiness.
  • Avoid sun exposure. UV rays can cause fading and uneven healing, so always protect your brows with sunscreen or by wearing a hat when outdoors. (Proper sun protection is important after your brows are healed, too!)
  • Don’t pick or scratch. Let the scabs fall off naturally. Picking can lead to scarring or patchy areas.
  • Avoid makeup on your brows. Makeup can introduce bacteria and interfere with the healing process. Stick to using the aftercare products provided by your technician.
  • Drink plenty of water and avoid excessive alcohol usage, which slows down healing.
  • Avoid facials, lasers and chemical peels/treatments until your brows fully heal. 

What Affects the Microblading Healing Process?

The microblading healing process can be influenced by several factors, including:

  • Skin type. Oily skin may experience faster pigment fading, while dry skin may take a little longer to heal.
  • Aftercare. The more diligently you follow your aftercare instructions, the better your results will be.
  • Lifestyle factors. Smoking, drinking or excessive sweating from high-intensity exercise can slow healing or cause early fading. 

When to See a Professional

If you’re not sure whether your brows are healing correctly, don’t hesitate to reach out to your microblading technician. It’s important to get a touch-up appointment after 6–8 weeks to ensure your brows are as full and even as possible. 

Signs You Need a Professional Check-Up:

  • Excessive redness, swelling, or discomfort
  • Uneven healing or fading in certain areas 

The microblading healing process can feel long, but it might be the most important part of achieving beautiful, long-lasting eyebrows. Recognizing the different microblading healing stages and following proper aftercare instructions can make all the difference in how quickly your brows heal. 

Be patient, stay consistent with your aftercare and don’t hesitate to reach out! 

Want flawless brows? Book your microblading appointment with Stephanie Moss Salon today, and we’ll guide you through every step, from the consultation to the healing process and beyond! 

Don’t Panic! Here’s How to Get Hair Dye Off Skin

By | Trends

You’ve got a fresh new color that looks fantastic on you, it’s styled perfectly and you’re really feeling yourself. Then you look in the mirror and realize that you’ve got some new smudges along your hairline — uh oh. 

If you’ve ever had a hair dye mishap, you aren’t alone.  

Getting hair dye on your skin (whether it’s your hairline, ears or hands) is stressful, especially if it’s from a DIY boxed dye job or you aren’t sure how to fix it. But don’t worry! Hair dye stains are totally fixable with the right approach. Below, we’ve got simple, effective ways to remove hair dye from your skin so you can get back to loving your color. 

Solutions to Remove Hair Dye from Skin Fast

If you’ve got hair dye on your skin, try one (or a few) of these tried-and-true methods to lift the stain effectively.

1. Makeup Remover or Micellar Water

Makeup remover and micellar water aren’t just for taking off your eyeshadow or foundation — they can also dissolve hair dye stains on your skin. Both are gentle and easy to use, making them a great option for sensitive areas like the face or hairline. 

How to Use: 

  • Soak a cotton pad with makeup remover or micellar water. 
  • Gently swipe it over the stained area until the stain lifts. 
  • Repeat as necessary until the stain is gone.

2. Oil-Based Solutions

Natural oils like coconut oil, olive oil and baby oil can be lifesavers when it comes to removing hair dye. They work by breaking down the pigments in the dye without damaging your skin. Plus, they’re soothing and gentle — you won’t just be getting the hair dye off your neck or hairline, you’ll be giving yourself a little spa treatment! 

How to Use: 

  • Apply a generous amount of oil to the stained area.
  • Let it sit for 5–10 minutes to loosen the dye.
  • Wipe off with a clean, damp cloth or rinse with warm water.

3. Rubbing Alcohol or Hand Sanitizer

A little bit of rubbing alcohol or hand sanitizer can work wonders for removing hair dye. Keep in mind, however, that these solutions could be drying or irritating. Always patch-test first, especially if you have sensitive skin — you don’t want to just swap out your problems! 

How to Use: 

  • Dab a small amount of rubbing alcohol or hand sanitizer onto a cotton pad.
  • Gently rub over the stained area until the stain lifts.
  • Follow up with a moisturizer to restore hydration.

4. Exfoliation with a Gentle Scrub

Sometimes, a little bit of exfoliation can do the trick. Gentle scrubs like sugar or salt scrub can lift hair dye without needing harsh products or treatments. 

How to Use: 

  • Use your favorite scrub product — this is easily done in the shower as part of your regular routine.
  • Gently massage the stained area with a circular motion.
  • Rinse thoroughly with warm water.

5. Dish Soap + Baking Soda

This DIY combo is a great alternative to a scrub for those who want a deeper clean. Dish soap has degreasing properties that can lift stubborn hair dye stains, while baking soda provides the perfect exfoliant to remove the pigment. 

How to Use: 

  • Mix 1 tablespoon of dish soap with 1 tablespoon of baking soda to make a paste.
  • Apply the mixture to the stained area and let it sit for 5–10 minutes.
  • Gently scrub the area and rinse with warm water. 

Tips to Avoid Hair Dye Stains

Now that you know how to clean up a hair dye mishap, let’s talk prevention. Taking a few simple steps can save you from hair dye stains in the future: 

  • Prep your skin before dyeing. Apply a barrier like petroleum jelly or a thick moisturizer along your hairline and on your ears to keep unwanted dye from sticking to your skin.
  • Wear gloves. They’re essential for protecting your hands while applying dye.
  • Clean up immediately. The sooner you address a stain, the easier it is to remove it. Keep a damp cloth nearby while coloring your hair to wipe off any splashes right away. 

When to See a Professional

If you’re dealing with a stain that seems unusually stubborn, it may be time to call in the pros. A stylist can safely remove the stain with a professional grade color remover. If you’re irritated by the above solutions or you’re struggling with a persistent stain, don’t hesitate to reach out for expert help. 

Of course, getting your hair colored by a professional stylist will minimize the chances of getting dye in the wrong places to begin with! Practice makes perfect, and we’ve got experience making sure that hair dye stays exactly where you want it — on your hair. 

Getting hair dye on your skin isn’t the end of the world. With these simple suggestions, you can get back to your gorgeous new hair color without any added stress. Whether you’re using makeup remover, oil or DIY hacks like baking soda and dish soap, these remedies will help you erase the stain and get on with your day. 

Hair dye mishaps happen to the best of us. Just remember: don’t panic! With the right tips and tools, you’ve got this. 

Book your next appointment with us today and leave the stress of DIY hair dye behind. Let the expert stylists at Stephanie Moss Salon give you the perfect color without the mess. 

How to Curl Your Hair with a Flat Iron, Step-by-Step

By | Trends

If you’ve ever struggled with getting perfect curls, you probably weren’t thinking about using your flat iron for the job: that’s fair since it’s often just called a straightener! But your flat iron is one of the most versatile tools in your styling arsenal. With the right technique, you can create soft waves, tight curls and almost anything in between, without needing a curling iron or wand.  

So, if you’re wondering how to curl your hair with a flat iron, want a smooth and versatile look that saves you time, desire more control over the end result, and are looking to save space in your drawer or on your bathroom counter, we’ve got you covered. Here’s a simple, step-by-step guide to achieving beautiful curls at home, every time. 

Step 1: Collect Your Tools and Styling Products

Before you start curling, make sure you have everything you need: 

  • Flat iron: Choose a flat iron that’s the right size for your hair. For tight curls, use a thinner plate (1 inch or smaller) and for looser waves, pick a wider plate (1.5 to 2 inches). If you have short hair, thinner plates will help your curls actually be visible. 
  • Heat protectant: Always apply a heat protectant spray or serum to your hair to prevent damage from the flat iron’s high heat.
  • Hair clips: Sectioning your hair helps achieve even curls.
  • Hair spray: To ensure your curls stay in place all day. (Mousse is helpful too but needs to be applied on damp hair!)
  • Optional products: Texturizing or sea salt spray for added volume and a beachy texture. 

Step 2: Prep Your Hair

Start with clean, dry hair. It’s easiest to curl hair that isn’t freshly washed — second-day hair works great, but if you’re someone who wants an everyday wash, you can use some dry shampoo to simulate the effect. Here’s what to do: 

  1. Brush through your hair: Make sure your hair is detangled. This will help prevent any snags while you curl. 
  2. Apply heat protectant: Lightly mist your hair with a heat protectant spray or use a serum, make sure it’s evenly distributed to shield your locks from the heat and keep them shiny.
  3. Optional styling products: If you want extra volume or texture, now’s the time to apply a texturizing spray. 

Step 3: Section Your Hair

Sectioning your hair might feel like an extra step, but it’s the best way to create uniform curls. Working in smaller, more manageable sections helps every strand get curled properly. 

  1. Divide into sections: Use clips to separate your hair into three to four sections — bottom, middle, top and sometimes a front section for those finishing touches.
  2. Clip away the top layers: Start with the bottom layer and work your way up, curling one section at a time to avoid missing pieces and uneven curls. 

Step 4: Set Your Flat Iron Temperature

Flat irons can get pretty hot, so it’s important to choose the right temperature for your hair type. 

  • Fine hair: Set your flat iron to a lower heat, around 300°F.
  • Medium hair: Around 350°F is ideal.
  • Thick or coarse hair: You may need a higher heat, between 375°F and 400°F. 

Always start with a lower temperature to avoid heat damage and only increase if needed. 

Step 5: Curling with the Flat Iron

Now for the fun part! Here’s how to curl your hair with a straightener: 

  1. Take a small section of hair: Work with about 1 to 1.5-inch sections for defined curls. Smaller sections will create tighter curls, and larger sections will give you looser waves.
  2. Clamp the flat iron: Place the flat iron about 1 to 2 inches away from the roots. Clamp the hair between the plates.
  3. Twist and pull: Slowly rotate the flat iron 180° (half-turn) away from your face, and then gently pull the flat iron down toward the ends of the hair. The slower you pull the flat iron, the more defined the curl will be.
  4. Optional technique for loose waves: For a beachier look, you can twist the flat iron once and then pull it down quickly. This will create a softer, wavier texture rather than a defined curl. 

Repeat this technique on all sections, alternating the direction of the curls for a more natural look. You can curl the hair away from the face on the outer sections and towards the face on the inner sections for a more varied, relaxed finish. 

Step 6: Let Your Curls Set

Once you’ve curled each section, give the curls a few seconds to cool. This helps them hold their shape and last longer. 

  • Don’t touch: Avoid running your fingers through the curls too soon — this can cause them to fall out faster.
  • Spray with hairspray: For lasting hold, lightly mist your curls with hairspray. 

Step 7: Finish and Style

After your curls have totally cooled, it’s time to break them up and finish the look. 

  1. Separate the curls: Use your fingers (or a wide-tooth comb) to gently separate the curls. This will give you a fuller, more voluminous look.
  2. Add texture: If you want more texture or volume, spray some dry shampoo or texturizing spray at the roots or throughout your curls.
  3. Smooth flyaways: Use a small amount of hair serum or light finishing spray to smooth any flyaways or frizz, giving your curls a polished look. 

Pro Tips for Perfect Curls Every Time 

  • Use smaller sections for tighter curls. The smaller the section of hair, the tighter the curl. For looser waves, use larger sections and move the flat iron faster.
  • Change up your curl direction. Alternate the direction of your curls (away from the face, then towards the face) for a more natural, voluminous look. Curling everything in the same direction can give it more of a glamorous, old Hollywood look.
  • Don’t overdo it. Avoid curling the same section of hair multiple times to prevent damage. Keep your movements smooth and steady for the best results. 

Curling your hair with a flat iron is easier than you think, and once you get the hang of it, it might become your go-to technique for versatile, beautiful curls. Whether you’re aiming for beachy waves, defined curls or loose, voluminous locks, your flat iron can do it all. 

Frequently Asked Questions

It isn’t working! 

Don’t panic! Let’s troubleshoot. Some common culprits are: 

  • Using too much styling product, which might weigh down your curls.
  • Touching or brushing out your curls before they’ve cooled down.
  • Choosing the wrong temperature for your hair, either too hot or too cool.
  • Choosing the wrong size of hair straightener.
  • Grabbing too large a section of hair for each curl, so the heat isn’t evenly distributed.
  • Not using enough hairspray to set your hair.
  • Having extremely clean hair that doesn’t have enough grip to hold a curl. 

Experiment with these solutions and see if any of them make a difference — if you’re still stuck, come into the salon for a consultation and we can give you some tips. 

How long will my curls last? 

With the right products (like hairspray or mousse) and the proper technique, your curls can last all day or longer. Be sure to let them cool before touching them to set the curl! 

What’s the best flat iron for curling hair? 

You may want to look for a flat iron with ceramic or tourmaline plates. These materials distribute heat more evenly, reducing the risk of heat damage. That being said, there are tons of fantastic hair straighteners out there at a range of price points, so you can get the curls you want no matter your budget. 

Are there any haircuts that work best for flat iron curls? 

Certain haircuts can enhance the look of curls, while others might require a bit more work to create the desired effect. Longer hair is great for curls, and layers add some flexibility in how you style each section. A lob haircut can look fantastic with soft, bouncy curls, and the shorter you go, the more easily you can get that fun, voluminous look. Particularly blunt cuts might need a little more precision since the ends won’t naturally blend. Let us know how you like to style your hair in the morning, and our stylists can make sure you have a cut that’s easy to work with. 

Is it harder to curl shorter hair with a flat iron? 

Shorter hair (such as pixie cuts or chin-length bobs) can be more challenging to curl with a flat iron because you have less hair to work with. But the results are worth it! Use a smaller flat iron (about 1 inch or smaller) for tighter control over the smaller sections, then hold the flat iron at an angle, twisting it to create more definition. Although the actual styling process can be tricky, shorter hair also tends to hold curls for longer, since it isn’t being weighed down by its own length. 

Can I create volume with flat iron curls? 

Yes! In fact, flat iron curls can add amazing volume and lift to your hair. For more volume, use the alternating directions technique and add texture. For a voluminous body without as much curl, use larger sections of hair and go quickly to avoid overly defined ringlets. 

If you follow these steps, you’ll be able to curl your hair with a flat iron like a pro in no time. 

Ready to try it out for yourself? Or maybe you’d prefer to leave it to the professionals? We’d love to help you achieve your perfect style. Book an appointment with us today at Stephanie Moss Salon for a personalized consultation, a healthy haircut or to get the best curls of your life! 

Here’s What to Tell Your Makeup Artist for Your Wedding

By | Trends

Planning your wedding is an exciting time filled with details that can feel overwhelming — especially when it comes to your makeup. You want to look radiant, feel confident and make sure that your makeup reflects your personal style elevated. 

The secret to achieving your dream bridal makeup look, even if you aren’t positive exactly what you’re aiming for? Clear and open communication with your makeup artist. 

Start with Visual Inspiration

The best way to convey the look you’re going for is through visuals. Spend some time collecting images that resonate with you. Whether they’re from Pinterest, Instagram or bridal magazines, gather photos of makeup styles you love. 

Consider creating a mood board that highlights your favorite looks. This doesn’t just help you articulate what you’re envisioning but can give your makeup artist (MUA) a clear direction. 

What Should I Ask for When Getting My Makeup Done Professionally? 

Since makeup has become much more popular online, there are thousands of ways to refer to the look you’re interested in. Just make sure you’re on the same page as your makeup artist! 

As an example, “natural glam” wedding makeup is a popular request. But “natural” and “glam” are opposites! Usually, people are looking for “soft glam” makeup when they ask for this style, but even that can take on a million different appearances. Do you want false eyelashes? (Note: they don’t have to be huge!) Do you want winged eyeliner? Do you want everything in soft shades of brown? Do you want shimmer? 

It’s totally okay that there are different names for different styles of bridal makeup. But it definitely helps the process go more smoothly and efficiently when everyone is aligned on what you really want for your special day. 

Highlight Your Favorites

As you review your inspiration, try to take note of what you love about each look. Is it the soft glow of a dewy finish? The bold statement lip? Maybe it’s the way the eyes are accentuated with just the right amount of eyeliner. 

Make a list of the elements that speak to you, and don’t hesitate to share these specifics with your artist. The more details you provide, the better they can tailor the look to suit you. 

Even if you can’t put your finger on what your favorites all have in common, when your MUA sees all the looks you love, it’s easier to pick up on the patterns that may be there and figure out how they’ll translate onto your face. 

Discuss What You Don’t Want

Just as you should express what you love, it’s important to tell us the things you don’t.  

Maybe heavy contouring isn’t your style, or certain shades of lipstick make you uncomfortable. Be honest about your dislikes. This helps your makeup artist avoid any styles you won’t be happy with, so you feel your best on your wedding day. We won’t be offended!  

That being said, consider listening to your makeup artist if they have an idea that might be a touch out of your comfort zone, especially if it’s your trial run. Some incredible techniques aren’t part of a typical everyday look for most people, and that can be intimidating. But they might be the best way to create a beautiful, cohesive look. 

In the end, we always want to make you happy and you always get the final say. But listening to the experts, even if you don’t think you’ll agree, might surprise you! 

Consider Your Wedding Theme and Dress

Your wedding theme and dress both play a significant role in your makeup choices. If you’re going for a bohemian vibe, for instance, your makeup might be softer and more ethereal. Conversely, an elegant ballroom wedding may call for a more classic look. 

Discuss how your dress and overall aesthetic align with your makeup vision. Of course, there’s no rule saying you can’t mix and match! For the best results, you need to stay true to yourself. 

Don’t Skip the Trial Run

Before the big day, schedule a makeup trial. This is your chance to see how your ideas come to life — and your chance to make any adjustments if your vision isn’t exactly the same as you thought it’d be. 

Bring your collected inspiration, notes on your preferences and any products you’d like to try. Take photos during the trial, as they’ll be a helpful reference for your final look. Plus, it gives you peace of mind: not only will you know what to expect as far as your makeup goes, you’ll have the chance to get to know your MUA. 

Ready to get started on your wedding makeup journey? Book a consultation with our talented team at Stephanie Moss Salon. We’ll help you find the perfect look that reflects your unique style so you shine on your special day! 

Here’s How to Blow Dry Hair: Do’s and Don’ts

By | Trends

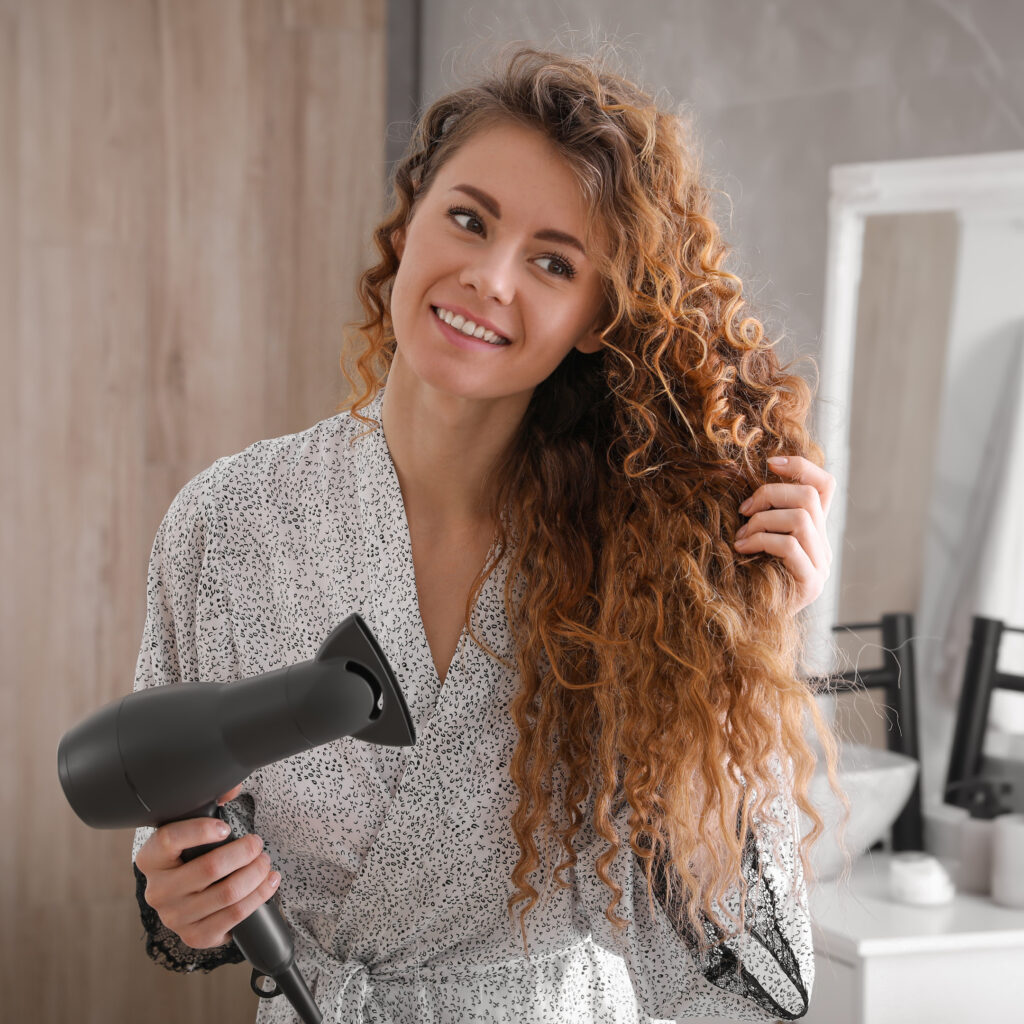
If you’ve ever tried to replicate that salon-fresh blowout at home and wondered what happened, you’re not alone. Blow drying your hair can be a bit tricky, but with the right techniques, you can achieve stunning results! The good news? We’ve got an easy list of essential do’s and don’ts of blow drying to help you master this art, so you can enjoy your beautiful new haircut after you wash it for the first time. 

How to Blow Dry Hair: The Do’s

Do: Use the Right Tools 

First things first — investing in a high-quality blow dryer can make a world of difference. Even airflow and heat that doesn’t fry your locks is an essential part of getting the style you’re after. Look for a blow dryer with adjustable heat settings, as this allows you to tailor the temperature to your hair type. Don’t forget the brushes you’re using! A vented brush helps with airflow, while a round brush can create gorgeous bouncy curls.  

Do: Prep Your Hair 

Starting with clean, conditioned hair will help set the stage for a smooth blowout.  

But the single most important step is to apply a heat protectant! If you can only take one step to prepare, this should be the one. Wet hair is more fragile than it is when it’s dry. Treat it nicely! You need to shield your strands from the damaging effects of heat, and a heat protectant is easy to use. Check the products you’re already using; some detanglers and shine creams may also protect your hair from heat.  

Do: Section Your Hair 

Taking the time to section your hair will make blow drying it much easier and more effective. Use a comb and then clips to divide your hair into manageable sections, starting from the bottom and working your way up. This ensures that each section gets the attention it deserves and stays perfectly styled. 

Do: Get Concentrated 

Using a concentrator nozzle on your blow dryer is a game-changer. It directs airflow where you need it most, making it easier to achieve a sleek finish. Remember to point the nozzle downwards to help smooth the cuticle and reduce frizz.  

Do: Blow Dry in the Right Direction 

Always blow dry from roots to ends. This not only helps to create a smooth look but also enhances shine. As you dry, follow the direction of hair growth for the best results. Even if you aren’t using a concentrator attachment, you’ll still want to point the hair dryer down the length of your hair to avoid frizz. 

Do: Use the Cool Shot Button 

Most blow dryers come with a cool shot button nowadays. This feature is fantastic for setting your style and locking in that polished finish. After you’ve styled your hair, give it a quick blast of cool air to help it hold its shape. If you use curlers, this can help set those, too! Applying heat opens the layers of your hair, and cooling it down helps seal the cuticle for a sleek result. 

Hair Drying Don’ts

Don’t: Use Too Much Heat 

It might be tempting to crank up the heat for faster results, but it isn’t worth it. Excessive heat can lead to damage, especially for fine and color-treated hair. Keep it at a medium setting and then adjust based on your hair type. 

Don’t: Skimp on Products 

Skipping heat protectants or styling products can spell disaster for your hair. Always use a heat protectant, and consider other products tailored to your hair type — whether it’s volumizing spray or mousse, smoothing cream or frizz-fighting serum. Of course, you don’t want to use too much, either. It’s a delicate dance! Ask your stylist the next time you get your hair done what they recommend and then give it a whirl. A little experimentation can go a long way. 

Don’t: Over-Dry Your Hair 

You have to strike a balance when blow drying. Even if your main goal is to take your hair from wet to ready to leave the house, over-drying your hair can leave it parched and prone to breakage. Pay attention to how your hair feels and stop when it’s just dry enough. 

Don’t: Rush the Process 

Take your time! Rushing can lead to uneven results and unnecessary frizz. Consider drying your hair a tiny form of self-care — a little pampering for yourself. Enjoy the process, and you’ll find it more rewarding! If that doesn’t seem up your alley, just remember that you should be holding on for a minute to start the process, anyway. Immediately blasting sopping wet hair with heat instead of gently patting it with a towel or letting it air dry for a while is a recipe for split ends. 

Don’t: Forget to Clean Your Tools 

Regular maintenance of your blow dryer and brushes will keep them performing their best. Dust and product buildup can affect how well they work, so take a few moments to clean them regularly. Your tools will thank you! 

Now that you’re armed with the essential do’s and don’ts of how to blow dry your hair, you can put these tips into practice. Practice makes perfect, so don’t get discouraged if it takes a few tries to achieve that salon-quality look at home. 

Want to skip the tutorial? Get a professional blowout from our team of stylists at Stephanie Moss Salon! We can walk you through the process, show you the best products for your hair type and send you home feeling fantastic. Book an appointment today!